Well, it’s been a while hasn’t it?
Sorry about that. I have been busy on the layout but it seems I lost my blog mojo for a while. My good friend Kelvin told me that I needed to get back to the blog, so here I am again!
This might be a big catch up as lots has been done since we last met.
Including, the bridge, the track weathering, weeds and ground cover.

The bridge was something I was keen to do but anxious to get it looking right. I looked on the internet for reference pictures to ensure I got my example looking relatively correct. I also decided that I wanted to use a blue/grey engineering type brick which I remembered from my days living near Norwich station.
This was achieved by priming the plasticard and then spraying on light coats of grey and black primer until the required random effect appeared. Sometimes I over did the black and would need to cover it with grey again but eventually I got an effect I was pleased with. This will also be weathered too.
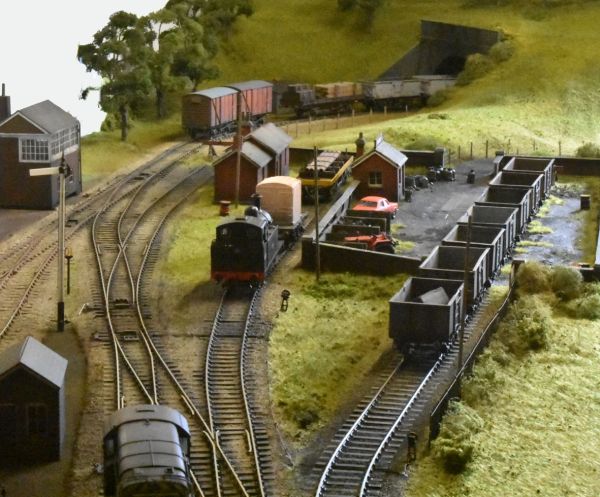
I placed a path around all the buildings that surrounded the track using plasticard. This also helped to hide the point where the buildings sit and allows the base of the buildings to hide below the path. I had purchased a Knightwing fuel depot for added interest and operating potential. However, the more I looked at it, the more I felt it would look like, well, a Knightwing fuel depot which lots of other people had. I therefore decided to make my own fuel point using certain parts from the fuel depot kit and plasticard around the track. I then became conscious of the fragile nature of some parts during transit to exhibitions so I had a brainwave!
I don’t have many inspired ideas but I remembered that in a tool box were some small neo magnets. These were almost the same size as the supporting columns of the fuel depot shelter. I stuck the magnets onto the bottom of the columns and then two more were joined up and stuck onto the ground. Now I had a shelter that could be removed for cleaning and transporting and the magnets allowed it to be removed easily and it could only go back in one position, the right position when I wanted to return it.

It was time to do the ballasting, and I know that this is a job that people love or hate. I had been given some play sand by Kelvin and decided that I would use this around the depot but I would also use the finest ballast I could get as well.
I stuck some sand down with PVA glue which would show at the side of the ballast and between areas where there was no ballast such as under point rodding, in the yard etc. Once this was dry, I removed the lose material with a hoover and then started to apply the ballast slowly and carefully. There’s nothing radical about this stage. I use diluted PVA with a drop of washing up liquid like so many others and apply this carefully with a syringe. I then leave it for a few days to go rock hard. Care taken at this stage can save a lot of time and avoid tears in the weeks ahead.

Once the ballast was dry I removed any stray pieces with a craft knife and hoovered up the stray ballast. I was now ready to weather the track and the surrounding areas.
I used Railmatch enamel paints with my Neo airbrush. I started with track grime but used this both sides of every rail to give a shadow to every track as well as the ballast.
I then used matt black around the points, frogs and where engines might sit for a while. While the airbrush was out, I sprayed the plasticard path, which had been primed earlier and gave the buildings a bit of a dust. I feel this has helped to bring everything together with some much needed consistency. The buildings were also very clean despite the industrial setting. The chimneys were given a sooty look at the tops and the oil depot got a little bit of attention too. I was really pleased with my efforts at this stage. It now started look a bit more realistic, like a real railway!
The next two stages were designed to add more detail and realism to the layout. I needed to weather the concrete areas so I started off with some lighter colours and got progressively darker until I felt I had the desired effect.
Once that was complete, I did something I had been itching to do for quite a while. I added some static grass in between the rails and around the yard. I was also keen to have grass coming up between the blocks of concrete where the expansion joins were. I was really pleased with the effect I had gained.


So I think I have nearly brought you up to date with developments. There is just one final thing to show you and that is some ground cover at the front of the layout along the yard walls. A little more green breaks up the monotony of browns and dull colours.


These pictures include the lights which are often left off due to their fragile nature.
So there you are. You are now up to date with the Winkle’s Yard project. I still have more work to do, especially work to complete the electrical control panel.
In addition to this, I need to start work detailing the stock which will run on the layout…but I’ll do that another day!